
Welcome to part 2 of my motorhome internet guide. This section covers Motorhome Satellite Internet!
Before you proceed, take a look at Part 1 – Internet Access Via MiFi (Mobile) and WiFi Repeater
Most folks will get all the Internet access they desire from Part 1 – cheaper, faster, more data and less hassle! Satellite Internet is for those folks who visit locations with no mobile coverage and no opportunity to ‘borrow’ WiFi (eg from a campsite, pub or nearby house). My own satellite-internet connection gets used on about 30% of my weekends away – usually down the end of a glen where I have headed for hill walking purposes! I am away in my van around 100 nights a year.
Introduction
If you go the route of a roof-mounted automatic motorhome satellite internet system, your bank balance will get depleted to the tune of £3K! Well beyond my budget, but with a little time/effort finding and installing the right kit, and a little effort each time you need to use said kit, you can have 2-way satellite internet for under £200 + £16/Month ongoing subscription.
Ku-Band satellite internet on Astra 3B at 23.5°E offers coverage across western Europe with speeds of around 10Mbits download and 384Kbits upload (depending on package). Used Ku-Band equipment frequently finds its way onto eBay, as owners get either DSL, Fibre or upgrade to newer Ka-Band satellite technology.
Ka-Band offers speeds up to 20Mbits down and 2Mbits up, but uses a multiple beam solution where your connection is locked to a beam. Unfortunately, there is no easy way to switch between the beams. Ka-Band covers the UK via two beams, and mainland Europe via many more. Another issue with Ka-Band is that it requires the dish to be pointed extremely accurately, its much less forgiving than Ku-Band, and if the dish is moving in a breeze atop a tripod then it just wont work. It also suffers markedly from Rain-Fade vs Ku band especially when not accurately pointed. Its not well suited to mobile use.
From the above, you’ll have decided upon Ku-Band, accepting the poor upstream speeds vs Ka! The £16/Month package limits downstream speeds to 4MBits, but this is still fast enough to stream Amazon prime, iPlayer or Netflix, but beware that doing so will blow through your data pretty quick!
This information is provided as-is. I make no guarantees as to its accuracy or suitability for your application. If in doubt about anything go find yourself an auto-electrician. If you foul anything up, its your fault, not mine!
Coverage

As you can see, coverage extends to most of Europe. A more official coverage map is available here (Last photo Astra 23.5E)
Equipment/Shopping List
Getting a working Motorhome Satellite Internet setup requires a number of different bits of kit:
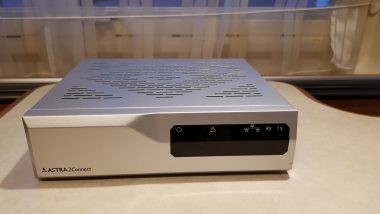
- A satellite modem – I went with Newtec
- A Ku Band iLNB (interactive LNB), this is like your Sky TV LNB but much larger and 2-way. It fits on the dish arm
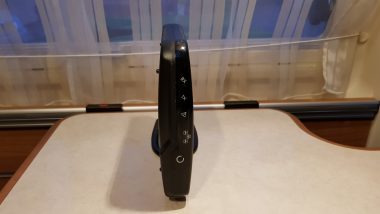
- A Newtec ‘Point and Play’ satellite finder
- A Satellite dish – ‘Fracarro PENTA DIGIT 68cm’ Pluto-Steel | Pluto-Alu | TVACDIRECT | ~£55 or eBay (NB Steel dish more durable and less wind affected)
- A 15V, 18V or 24V power supply depending on iLNB and Modem: Multi-Voltage Laptop PSU £10.97
- A tripod upon which to fit the dish: Amazon £22.95
- Some pegs or rocks to keep it from falling over!
- Figure-8 satellite cable to connect the iLNB to the Modem: Amazon £6.75 (keep this short – eg 10M)
- A Wifi Router to broadcast the satellite signal within the van AlfaR36 £54 | TP-Link £26.90 + PSU £9
- An inline switch to power the kit on/off + soldering and basic electrical skills: Amazon £5
- Fuse 3A either Inline or Fixed – If you also went for the MiFi and WiFi Repeater solutions then you’ll find the fixed fusebox much neater.
- An active Ku-Band account on Astra 3B @ 23.5E SatelliteInternet or BroadbandEverywhere £16-£20/Month for basic service
You’ll want to obtain your Newtec modem, iLNB and Point and Play from eBay for the significant savings this offers vs buying new (expect to pay up to £120). Many of the sellers are foreign, but the kit will work just fine in the UK. Sometimes they will exclude the UK as a shipping destination, however a polite email, informing the seller that you DO NOT require the dish (just the modem and iLNB) may have them change their mind. This goes for ‘collection only’ listings in the UK as well! You could also use the stock dish in place of item [4] but the stock dish is huge. Old and new modems below.
To find suitable kit on eBay setup ‘watches’ for the following search-terms:
- Newtec
- Astra2Connect
- Sat3Play
- ku satellite internet
- SES Broadband
- Newtec NTC/2252 (older modem in metal box)
- Newtec MDM2200 (also known as ‘NTC/2299’) (the newer modem – Black Plastic)
The kit you are looking for is one of the following:
- Older Newtec NTC/2252 with iLNB either NTC/2530 (500mW) or NTC/2532 (800mW) – the latter is better
- Newer Newtec MDM2200 with iLNB either ILB2110 (500 mW) ILB2120 (800mW) or ILB2140 (2W) – The latter is better
NB: In the case of the MDM2200, check that you are getting a Ku-Band iLNB and not a Ka-Band iLNB
NB: Avoid the NTC/2250 – this does not support some Ku-Band configurations, and does not support the 800mW iLNB
In the event that you cannot obtain all the parts off eBay, take a look at satelliteinternet’s Spares Website or give them a call. See: 800mW iLNB (For NTC/2252 Only) and the Point and Play Tool (works with MDM2200 and NTC/2252) Note: they don’t list iLNB’s suitable for the newer MDM2200.
I also have some kit to sell – see the end of this blog!
I’ve Got My Kit! – Lets Check If It’s Working
Read The Manuals!
Checking The Kit Works, and configuring for Astra 3B @ 23.5E
Before you throw any more money at it, does it look like its gonna work. Run through the following steps:
- Plug the modem into the mains using the (hopefully supplied) mains adaptor – Do the lights come on on the modem?
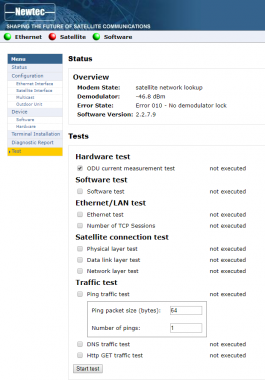
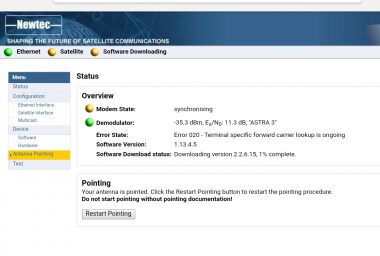
- Turn off your PC’s wifi and connect the PC to the modem using an Ethernet connector. Browse to http://192.168.1.1 – Do you see a Newtec Webpage (see pic below)?
- If not, ensure that the PC’s ethernet connection is set to DHCP See Here. Browse to http://192.168.1.1 again – Do you see the webpage now?
- Connect up the iLNB using the shotgun cable (be sure to connect TX to TX and RX to RX (mark TX lead both ends with some tape!)
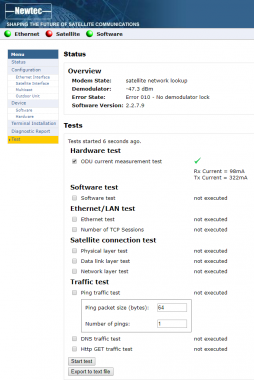
- On the Newtec Modem webpage, select ‘Test’ select only ‘iLNB Current Measurement Test’ Click ‘Start Test’ – Do you see values for Rx and Tx currents as per pic below?
- If NO, check all connections to the iLNB, clean any corroded copper connections
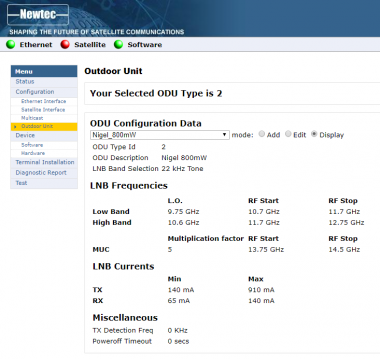
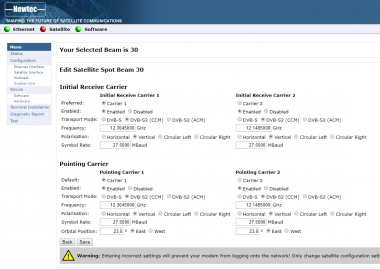
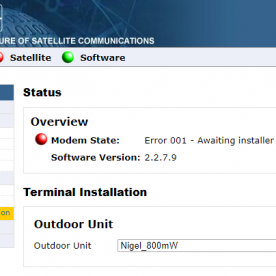
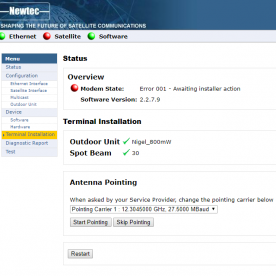
Next we will setup the iLNB otherwise known as the ODU (outdoor Unit) as well as the ‘Satellite Interface’ Referring to the photos underneath, do the following:
- If present, click ‘Outdoor Unit’ (not all Newtec modems have this – it might be fixed on yours)
- Check the values against those in the photos below, edit as necessary (The ‘Type ID’ is not important)
- You can edit an existing ODU config or make a new one, but remember the ID of the one you choose.
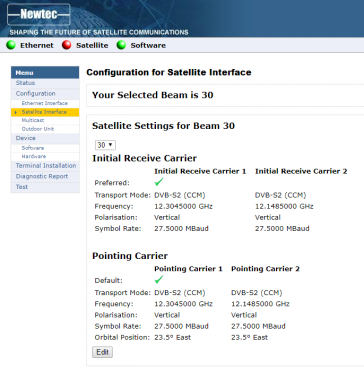
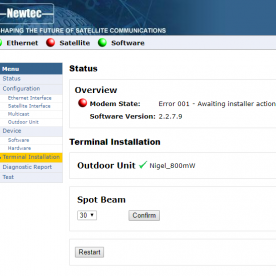
- Next, click ‘Satellite Interface’. Several ‘Beams’ may be configured, select the that best matches the details below eg ’30’
- Ignoring the ‘beam’ number, edit as necessary, the details on-screen until they match (exactly) those below
- Save your configuration, remembering the ‘Beam’ number you used.
Right, now we can check the ‘Point and Play Tool’…
- Disconnect Tx at the iLNB, and connect it to the ‘Point and Play Tool’ instead. Turn on the point and play – Green LED comes on?
- Plug in the supplied (hopefully) headphones. No headphones? Buy this
- In the modems web-interface, click ‘Terminal Installation’ followed by ‘Start Pointing’ Select any remaining defaults – Do you hear the Point and Play tool buzzing?
- If the point and play does not buzz, check its battery (PP3).
- Disconnect iLNB, Point and Play Tool etc
Hardware Setup
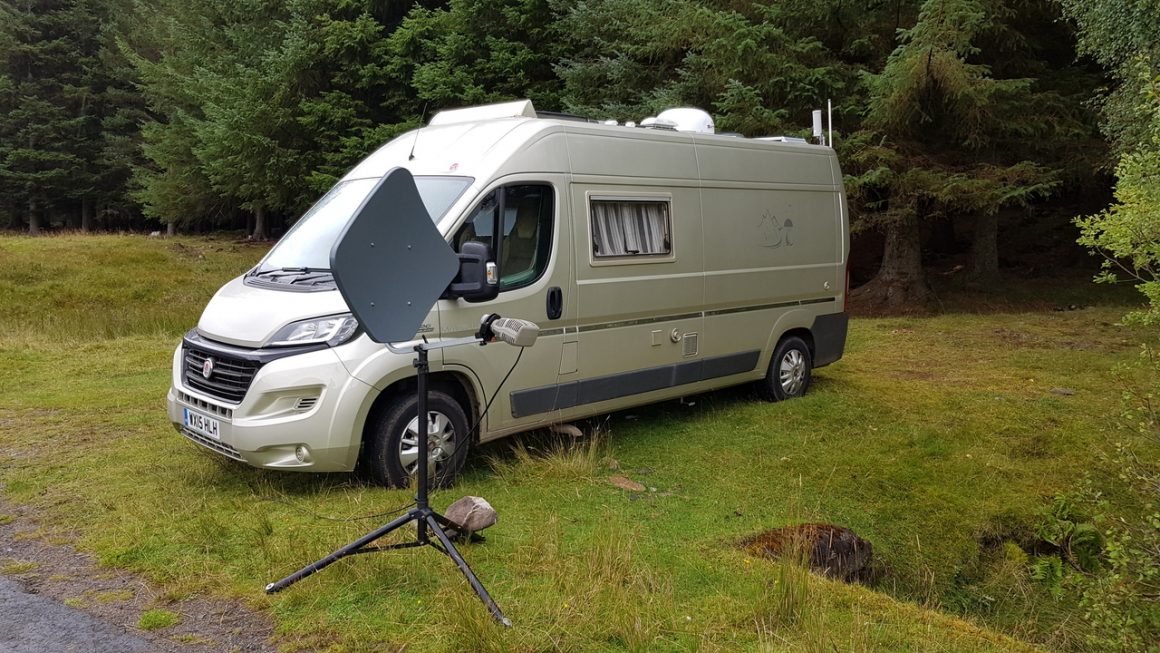
Basic Setup and Rough Pointing
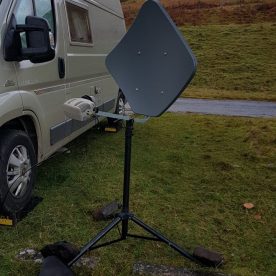
- Assemble the dish, and fit the upper section of the tripod (2ft long metal tube) to the rear of the dish using the ‘U’ brackets
- Setup the tripod, peg it down on a level area. Mount the dish with LNB arm on top of it
- Fit the iLNB loosely into the holder supplied with the dish and bolt this to the LNB arm
- Visit www.dishpointer.com, enter your postcode and select the satellite ‘23.5E Astra 3B’ Click go – Note down the elevation and LNB Skew.
- NB: Skew and elevation don’t vary hugely across the UK, but accurate skew important for good upstream speed
- Set The Azimuth: With the aid of a compass point the dish in the direction of the Azimuth noted down.
- NB: 23.5E means 23.5° EAST of SOUTH. eg 23.5° LEFT of SOUTH. Tip, it’s just to the right of any house mounted sat-tv dish!
- Set The Skew: Rotate the iLNB while reading the scale printed upon it. Set this to the LNB Skew value you noted – use lower part of LNB bracket as setpoint
- After setting, the connectors should be pointed down/right with you facing the dish the iLNB should be as close to the dish as it will go
- Set the Elevation: Download a level app on you phone eg: Bubble Level on Android
- Lay the phone on the LNB arm, adjust the arm until the smartphone reads whatever you noted down MINUS 11. eg for 24° set the arm angle to 13°
- Connect the RX lead between the modem and the iLNB and install the point and play tool at the iLNB end of the TX lead as before.
- Power up the modem, ensure that you can login to the webpage from your PC/Laptop. Browse to http://192.168.1.1 as before
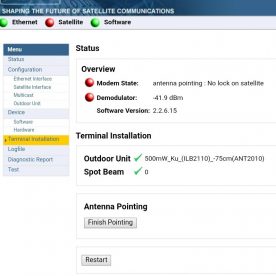
Accurate Pointing
- Click ‘Terminal Installation’ when asked, choose the ‘ODU’, and ‘Beam’ you noted down beforehand (see pics below)
- Select the ‘Pointing Carrier’ shown and click ‘Start Pointing’ – Point and play tool buzzes (remember the headphones!)
- Swing the dish around on the tripod slowly until the tone on the Point and Play Tool changes
- Interrupted high tone means correct satellite but not optimally pointed | high continuous tone means pointed optimally | low tone means not pointed or wrong satellite
- Refer to the user manual for more detail on pointing!
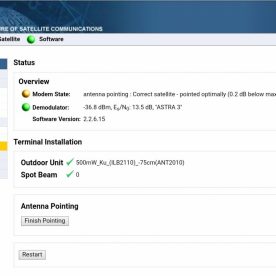
- Once you have a high continuous tone, check the web interface. It should read ‘Correct Satellite – Pointed Optimally’ (see image below)
- Remove the Point and Play tool and connect the TX lead to the iLNB
- On the Web Interface, click ‘Finish Pointing’
- The modem will now try and connect (this will fail as you likely wont yet have an account on the satellite)
- The modem will likely fall into a (failing) loop trying to download new firmware, or it could just show ‘Error 50’ (login failure)
Getting an Astra 23.5E Ku Band Account
To complete any firmware update, and begin transferring data, you’ll need an account on the satellite.
The underlying provider for both of these services is SES Broadband Services – The companies below are re-sellers. There are others too, and also options on Astra 28.2E. Most consumers have been moved off Ku-band to Ka-Band and to land-based fibre and 4G. Since I signed up over a year ago, I have found that speeds have gotten better. I now regularly see the headline speeds, and its certainly been enough to stream iPlayer and Netflix.
Note: The upload speed especially will depend on the accuracy of your pointing!
Before you contact either of the companies below, you will need your ‘AIR MAC’. Satellite-based internet does not use a username/password combination for login, it uses the ‘AIR MAC’. This is a hexadecimal code that is unique to your modem. It is written on the modem and also displayed at the top of the Newtec web page for the modem.
NB: Since this was written, Satellite-Internet are in the process of selling the Satellite part of their business to another provider. See their announcement here
Satellite Internet used to offer Ku band accounts via a an online order. To get one today, you will have to contact them by phone explaining that its a mobile Ku band setup. They are by far the cheapest @ £16/Month (with 1 month contract) for 3GB, with a 4Mbit download and a 384Kbit upload speed, and a £50 setup fee. You can see their 23.5E Ku band page here
Beyond your chosen allowance, the Ku Band service will continue to work – at much lower speeds – termed ‘follow on speeds’. This is only 256Kbit, but it is essentially unlimited. It will reset to normal speeds at the end of your billing period or you can pay for a ‘reset’.
Satellite internet provides you with a ‘dashboard’. Here you can check the status of your account, raise support tickets, upgrade, downgrade and see how much data you have used.
I have not used broadband-anywhere myself, and they are more expensive than SatelliteInternet. They do have a USP though in that their ‘Go’ products are ‘unlimited’ – where ‘Unlimited’ means ‘use it too much and we will slow you down’!
They offer two types of package ‘Easy’ and ‘Go’ which may be viewed here
Easy: Their cheapest offering is £20/month or £172/Year on ‘Easy’ with a £25 setup fee. This has a 1 year contract and comes with 2GB of data with a 2Mbit download speed and a 256Kbit upload speed. They do not offer ‘Follow On Speeds’ like Satellite Internet.
Go: This costs a minimum of £41/Month also with a 12-month contract and a £25 setup fee. The package is advertised as ‘unlimited’, but is subject to a fair use policy. You will be throttled as you download more data, and also if the network is congested. The 1st 3GB of data is essentially not throttled. Download speeds are 3Mbit and upload speeds, 256Kbit.
All speeds are ‘Up-To’, by 4Mbit I mean 4 Megabits per Second. For comparison, Your home ADSL might be up-to say 15Mbits/second while your home Fibre could be up-to 70Mbits/second.
Usefully, even when abroad, these providers give you a UK IP address – as such there is no issue using iPlayer, Netflix etc – the provider thinks you are in the UK even though you might be in the Alps. Be careful with internet banking apps here – jumping between the Alps and UK instantly might smell like fraud to your bank.
Firmware Update and Satellite Connection
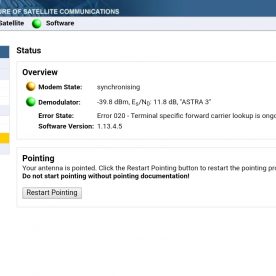
After you have handed over your money, your account will be activated within 24 hours. If the kit is still setup from your ‘test pointing’ session above, then turning the modem OFF and then ON (Power Cycling) should get you connected. If not, you will need to re-point as before.
If a firmware update is required, this will take some time – just leave the kit setup, it will complete in under an hour. I believe that the firmware is transmitted round-robbin using the satellites’ login transponder. The update will be ‘forced’, there is no way to skip it and just connect anyway.
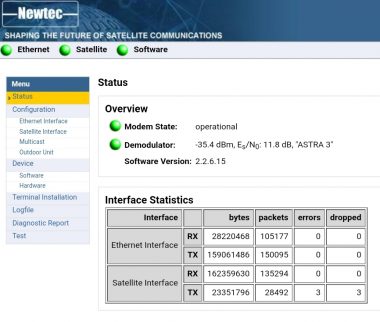
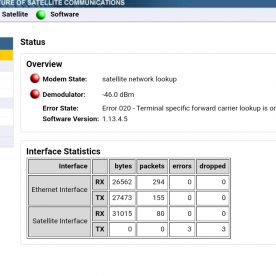
Assuming everything went well you should see a screens similar to those below:
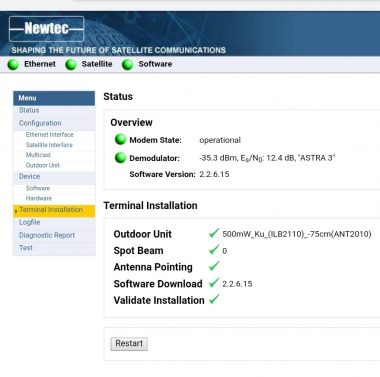
The bit where it says 11.8dB relates to both how accurate your pointing was and your location/surroundings, and also the weather! The higher this number the better the signal. At anything below about 8dB you can expect to have issues with the transfer of data. The highest I have got this (at home in central Scotland) was 15.1dB.
A few errors and dropped packets is normal – especially during the period right after pointing while the modem is logging in to the satellite network. If these values continue to increase then it is likely that you have an issue, the dish has shifted, or the wind is simply blowing it about too much. In this situation, you can expect to have issues transferring data.
Transferring Data
To test your connection, simply visit some web pages on your laptop. You will notice a pregnant pause of around 1 second after you click a link before anything happens, this is normal. The Satellite you are communicating with is in geostationary orbit, 40,000 KM away, 2 satellite ‘hops’ (up and down) are required before you see the results of a mouse-click. Your data has to travel 160,000KM and since radio waves waves travel at the speed of light (299792 KM/sec), but that still means a delay of 0.54seconds just while the signals are travelling. Add in the earth-bound latency and you end up close to the 1 second mark. This is termed ‘latency’.
A good way to see the difference here is to start a ‘command prompt’ on your home broadband connected PC and your satellite-connected laptop. Type Ping 8.8.8.8 [enter]. Results below:

Don’t let the high latency above put you off though, its still perfectly usable, and its way way faster than a 2G mobile phone signal. I would not use it over a 3G or 4G phone signal though obviously.
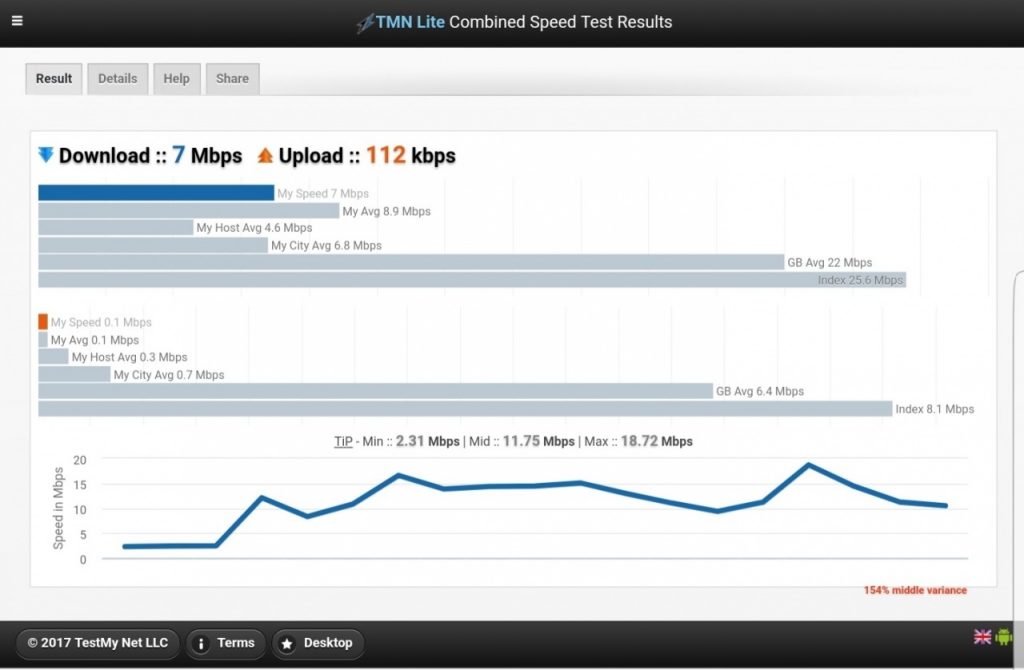
If you wish to perform a speedtest note that many of the common speedtest platforms don’t work properly with satellite broadband due to the latency. Instead, use the service provided by satellite internet via your dashboard or try this one.
Adding WiFi
This is 2017 so we’ll need to add WiFi to the above! I would recommend the ‘TP-Link‘ MR3020 WiFi Router over the R36 here. Its more compact, and easier to setup. You may also be able to employ an old router you have lying about.
- Go download the manual for the TL-MR3020 here
- On the TP-Link MR3020, adjust the sliding switch on the side to the ‘AP’ setting
- Using an ethernet cable, connect the Newtec modem to the MR3020
- For test purposes, find a mobile phone charger and a Mini USB cable and power up the MR3020
- On your laptop/tablet/phone, connect to the SSID ‘ TP-LINK_POCKET_3020_XXXXXX’
- You’ll find the encryption key on the rear of the unit – enter this when prompted
- Your device should connect to the MR3020, and you should have internet access via satellite as before
Further configuration of the MR3020 may be desirable – to change the SSID name, set your own WiFi password and secure your network. To do this you need to login to the MR3020
- Browse to http://192.168.0.254
- Login as user ‘admin’ with password ‘admin’
- To change the wireless name (SSID), see page 199 of the user manual.
- To change the wireless password, see page 206 of the user manual.
- To change the device password from the default ‘admin’, see page 229
In AP mode, the M3020 behaves as an ‘Access Point’ rather than a ‘Router’ (eg it does not have a firewall). The firewall on the Newtec modem is basic at best. If you wish, you can enable the M3020’s firewall as follows:
- Turn it off, and move the switch to the 3G/4G position
- Power it up
- Connect to the wireless network as before
- Login to the M3020’s web page as before
- Referring to page 36 of the user manual, select ‘WAN Only’ save your changes
Installation In The Van
If you don’t actually ‘install’ this kit then you will find that the time required to set it up from scratch, and the multitude of parts means it will end up getting little use. Installation is obviously specific to the van in question, but below are some tips you might like to consider.
- Buy yourself a Multimeter
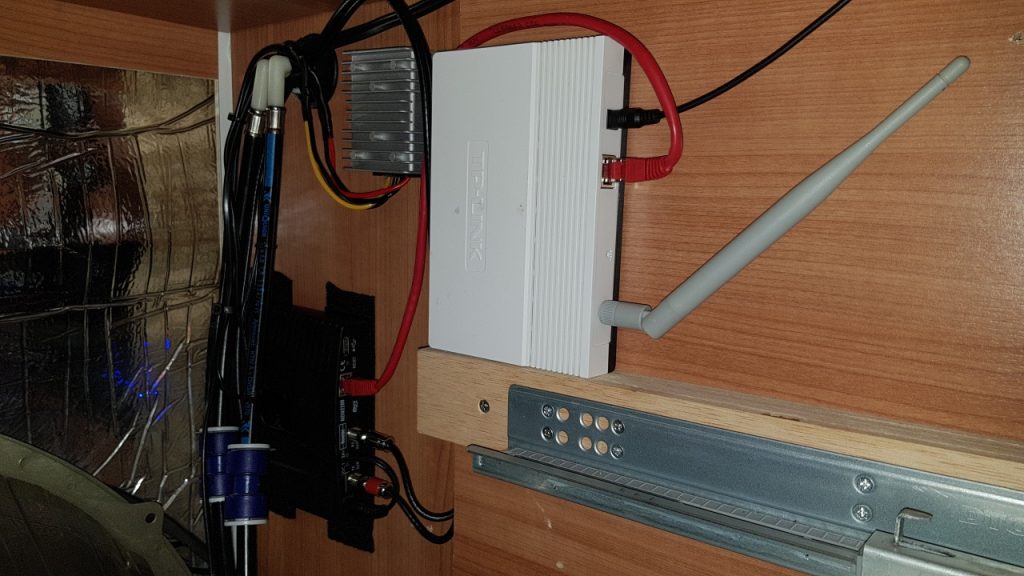
- Locate some otherwise dead space, out of sight (drawer, cupboard, garage) – Mine is behind a drawer under the bed
- Get power to this location (via a fuse 3A combined for Newtec Modem AND M3020 Router)
- Mount the inline switch with sticky fixers somewhere accessible (I open the drawer slightly and flick the switch)
- Use your soldering skills or a wiring block to feed 12V into both the laptop power supply and the M3020 power supply (watch the polarity)
- Set the laptop power supply to the correct voltage [15V for silver Newtec Modem | 18V for Black modem with ILB2110 (500 mW) or ILB2120 (800mW) | 24V for ILB2140 (2W)]
- Select a tip for the laptop PSU that fits the Newtec Modem, or chop off its supplied DC cable and use this. (Be sure of polarity)
- Use velcro to mount the Newtec modem, TP-Link router and power supplies (they don’t need to be close to one-another)
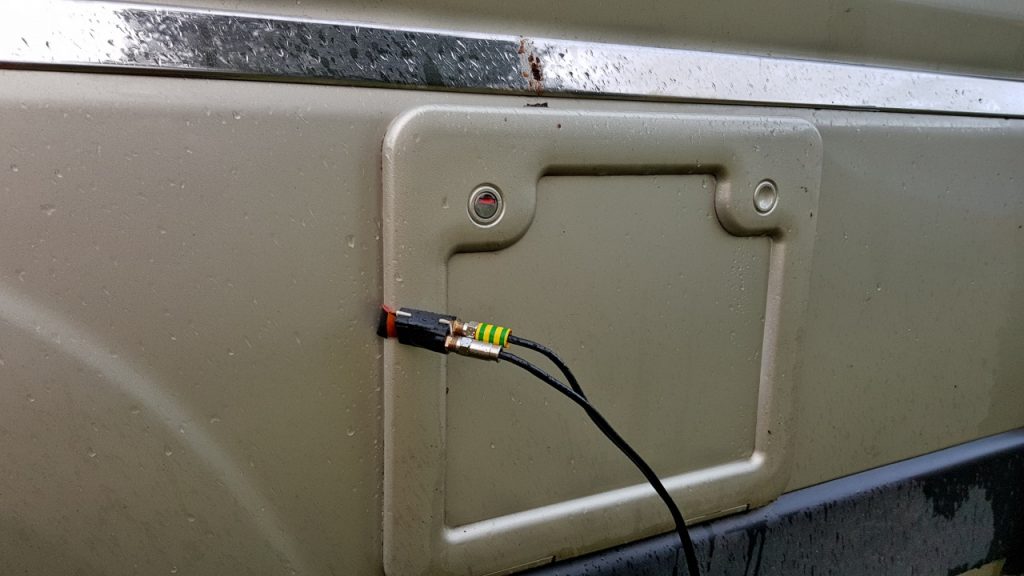
- Purchase a short shotgun satellite cable of a length that will get you to an exit point from the van (I used toilet cassette door!)
- Purchase 2 off through window satellite cables
- Wire in all of the above, you could exit vehicle via back doors, garage door etc
- No holes drilled, everything removable without a trace!
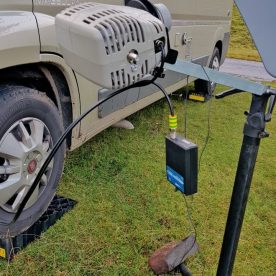
Pointing, we have already covered, and nothing has changed apart from the fact that the connection to the Newtec Modems setup page is now via WiFi. I have gotten this down to a fine art these days and I can have an internet connection within 10 mins max of parking up. Expect it to take you a wee bit longer the 1st time though!
Storing All The Bits
Even if you have gone through the previous section and installed most of the kit, you will still have a bulky dish, tripod, iLNB and cable to store. I have few tips to make storage a little easier:
- Remove the LNB arm from the dish, and reverse the bolts (eg make them stick out rearwards). Buy these to secure the LNB arm.
- Using some more of these clamping nuts, replace the nuts for the LNB end part to facilitate east removal
- Obtain a small padded coolbag (mine came from B&M) to store the LNB, cable, pegs, point and play tool
- My dish fits upright under the rear bed, with some toggle fasteners to keep it on place (B&Q)
- The LNB arm and the Tripod go in the cupboard above the cab
Going The Extra Mile
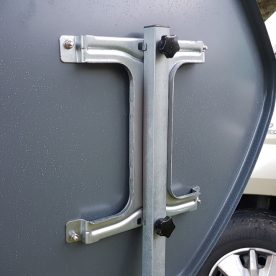
You may have noted from my photos that my dish does not use the standard mounting mechanism. Rather, mine fits to the tripod via a single hole in the LNB arm at the balance point of the assembled dish. This was a time consuming, but fairly cheap modification that went something like this:
- Remove the bracket from the back of the dish, and using a saw, cut the ‘ears’ off the bracket and make them good.
- Obtain a 34.9mm bicycle seatpost – cheap is best!
- Saw off the seat mount square
- Cut a ‘slot’ in the top of the post EXACTLY 25mm across and about 35mm deep such that the remaining material sits either side of the slot
- If a mate has a mill/metal router this will make for a neater job!
- Drill an 8.5MM hole from one side to the other (make sure its square)
- Assemble the Dish, LNB arm and LNB, find the balance point
- Drill an 8.5mm file through the LNB arm (the side to side!)
- Buy an M8 Lever Handle Male + Female
- Roughen up the surfaces where they will meet (inside seat-post, and on LNB Arm)
- Insert seat post into tripod clamp, and mount Sat dish assembly using lever handles
- Job Done!
Additionally:
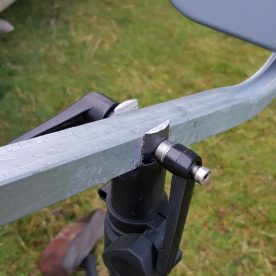
- I put some heatshrink on the tripod legs – to protect them from the rocks I use to keep it upright in the wind
- I bought some screw in pegs and a leccy screwdriver and drilled out the tripod legs for a solid ground fixing
- You can delete un-used ‘ODU’ and ‘Beam’ configurations – this speeds up pointing.
NB: The iLNB is delicate – they don’t like being dropped or blown over by the wind!
Hi
Generally speaking, with antenna’s, size matters, and the larger ones will perform better. There are some pretty clever designs re Puk antenna’s squeezing as much gain as poss from their small size, but this only goes so far. If you look at the specs, it says 6.2dBi (Max) – note the Max! 3G and 4G services run across 2 RF bands – 700MHz-950MHz and about 1800MHz to 2600Mhz. The antenna’s are designed to cover both these ranges eg they are ‘dual band’. It is my suspicion that he PUK antenna will only give you its 6.2dBi at 2600MHz. I would anticipate 2-3dBi at best from it at 800MHz. The issue here is that 2600MHz is short range, high capacity, often deployed in area’s of high population density. while the 700-900MHz frequencies are used to bathe large area’s of countryside in 4G, but lack the overall capacity. In the UK, 1800MHz is also frequently used for 4G (by EE and Three), this sits somewhere in the middle, and the gain given by the PUK will be somewhere around 4dBi at a guess. In contrast, the Solwise 4G-REN6702705X will do 4dBi on 900MHz and 5dB 1800-2600MHz.
I’ve just checked the spec sheet for the Poynting here: https://www.solwise.co.uk/downloads/files/a-mimo-1-1-datasheet.pdf and the gain falls to just 1.8dBI in the 900MHz band.
The PUK antenna is obviously hugely more appealing size-wise, and may well suit better, and I suspect that the Poynting is one of the higher quality choices available for a PUK antenna.
As for mounting of the 4G-REN6702705X yes, they absolutely must be mounted vertically! Depending on the mounting method, a permanent mount could see them only slightly taller than your rooflight, and likely lower than the common status TV antenna’s you see.
Let me know if you are interested in the Satellite kit. Satellite internet are in a bit of a state of flux currently – they are not accepting new Ku band connections, and have sold their business to SES. SES are yet to fully take over, and its not currently known what they will choose to offer BroadbandAnywhere.co.uk will still flog you a Ku band connection, but their prices are not as keen as satellite-Internets were. In my own useage, I am finding area’s that previously had no signal where I used to have to deploy the dish are now getting 4G with EE. This is mainly down to EE winning the ESN (emergency services network) contract in Scotland, and sticking transmitters up in area’s that previously did not even get 2G! That said, it still gets used at least once a month down the end of some lonely glen, and I do like my internet access!
Thanks for the response and detailed explanation. Much appreciated. I’m considering the following on a telescopic pole, as at least it’s only a single antenna for 4G: https://www.solwise.co.uk/4g-antenna-omni-ren66005x-odnx2.htm
Otherwise I’ve found one of the 5-in-1 Poynting devices for a good price, so that may be worth a shot.
I expect I’ll tackle this in stages with the 4G and WiFi components first, then consider satellite. I have a Huawei E5577 already, so a decent 4G antenna seems a good start. I’ll be in touch at a later date if the sat equipment is still of interest and available.
Cheers,
Joseph
I have just bought your last, spare, MDM2200!!
I used to live in an area up in Aberdeenshire where BT (spit!) couldn’t provide broadband, so we had a satellite system (sponsored by the Scottish Government) installed. It worked fine, if a little slow. I moved house but now travel (motorhome) a lot into Europe and decided to go back to a Sat-based system, use it at home as well, rely on a mobile for telephone use – and throw BT off the property. I feel about them the way you feel about ScroteRail.
All the foregoing paragraph apart, I’ve sourced all the stuff I think I need – apart from the milling machine – but I am REALLY struggling to source an iLNB. I was hoping to find a Newtec ILB2140 but would go for anything that will work properly. Someone from Europasat is supposed to ring me back ref sourcing a Ka/Ku band iLNB but it hasn’t happened yet.
Do you have any suggestions, please?
Just one other brain-pick, if I may: Would a TP-LINK TL-WR840N do the wireless router job instead? (I have one already)
Regards
Will
Hi
I picked my LNB up via ebay. It took a few weeks for one to show up, and I setup a watch for the three suitable Ku Band iLNB’s. You’ll see zero benefit on receive speeds between any of the iLNB’s and the 2W and 800mW iLNB’s will only show improved speeds at the edges of the satellite footprint. Prior to obtaining the 2W iLNB to use with the MDM2200, I was using the older silver modem with an 800mW iLNB – I upgraded when I saw the job-lot (of which you now have one) on fleabay.
When I had the older modem, it came with a 500mW iLNB, unfortunately, the tripod went over in the wind, and the iLNB was totalled when it hit some concrete! I obtained an (800mW) replacement as a service spare from Satellite-Internet (who are now Europasat) – this was not an issue back then with the spare turning up within a couple of days. It did cost me £100 though so an expensive mistake – I made sure that the tripod did not fall over again!
The MDM2200 and the iLNB’s it takes ain’t that old I would have thought that Europasat could have obtained you an iLNB in the same way that Satellite-Internet did for me. I would also guess that there’s hoards of Ku-Band iLNB’s out there not in use as folks either moved to Ka Band or finally got fibre.
Its worth pointing out that searching (manually) on eBay.co.uk will exclude any mainland-europe seller that specifies ‘no foreign shipping’, but when you setup an ebay watch on the kit you get emails for these items too. Most of these sellers can be persuaded to ship to the UK – especially when you tell them that you do not require the dish. Suggest a watch on ‘ILB2110’, ‘ILB2120’ and ‘ILB2140’. If you do manage to get the 2140, note that it requires 24V, not 18V like the others do. The power supply I mention in the article was for simplicity – it does all the voltages, but this one: https://amzn.to/2v21v9J would likely suit better (ILB2140 only!). Its also worth a general search for the likes of Newtec or newtec LNB – the 2140 I got was listed as ‘Newtec LNB’ – was obvious from the pic that it was the one I wanted.
Your WiFi router will work just fine – I believe it runs off 9V though so you will need a DC-DC converter. If you happen to have a USB socket around then you could step that up, but step-down is more efficient. See:
https://amzn.to/2qkaVZj USB step up
https://amzn.to/2qmwuHT USB Step up
https://amzn.to/2ql2zQw 12V step down
https://amzn.to/2qkHDtI 12V step down
Latter two are from China – long shipping times – see if you can find something more locally on ebay. Remember to use an inline fuse!
Many thanks for the quick response and the advice. I’ve set up the searches as suggested and I’ve taken note of the bit about a 24 volt power supply for the ILB 2240. It’s good news that the TP-LINK TL-WR840N I have will do the job – and by inference that I’d understood the thrust of your original article and the requirements of the setup. It was very well explained. You’re quite right that it requires a 9 volt supply which I intend to piggy back off the Modem PSU via a 2 amp Buck converter. I found this: https://www.ebay.co.uk/itm/332596545954 fleabay offering for a 10 amp PSU that I though would give a good margin of safety.
I have a couple of decent project boxes and a multi point fusebox from a previous motorhome (motorcycle winch) installation to keep things neat and safe. Doubtless they’ll need ventilation slots cutting, possibly a small fan, too?
The motorhome came fitted out with a couple of USB outlets but I suspect they will be kept for phone/e-reader/camera/gadget chargers, hence the Buck converter.
Here’s hoping I get flooded with fleabay iLNB offers. Fingers crossed.
Will
I’ve just spent 3 hours or so reading this and your 4G/WiFi guide. Thank you! Both have been extremely useful. This summer I’ll be heading off for 12 months in my van/motorhome, firstly to the west coast of Ireland then much of continental Europe and Morocco. I make a living online so getting access as often as possible is a must. I’m considering the satellite internet setup as you’ve described here and I’m watching your eBay auction. The £3k+ cost of the off-the-shelf units it totally prohibitive for most people. If one can stomach the monthly fee for a sat subscription it seems like a good back-up / insurance policy for when 4G and WiFi is unavailable. With regards to the 4G and WiFi configuration, you say that the puck antennas like (for instance) the Poynting A-MIMO-1-1 or A-MIMO-1 units on the Solwise website will perform less well than the other antenna you’ve suggested (e.g the 4G-REN6702705X that I believe you’ve fitted). Why is that? Is it because of a higher dBi gain? The A-MIMO-1-1 has 6.2dBi gain, which compared to some other units seems relatively high? Or is there something else I’m missing? Otherwise the integrated units with both dual LTE and WiFi seem like the ideal solution when it comes to simplicity, mounting and keeping a low profile on the roof. You describe mounting 3 of the 4G-REN6702705X-ODN antenna for combined LTE & Wifi; do these need to be mounted vertically to function optimally? Or could they be mounted ‘flat’ / horizontally on a van roof? I’m guessing not, but that would be useful for my purposes. Any advice greatly received. Thanks again!